Auto Repair & Diagnostics : How to Diagnose an Engine Problem

Wednesday, April 28, 2010

Short Stroke Conversion for toyota

Moto-P's Addendum... 
WHY DO WE HAVE TO DO THIS?  ITS A PAIN!!??
The following is to address the common question of "why" we need to cut (shorten) the strut case for using TRD short stroke.  For those who understand it, you can skip this section and get to work...
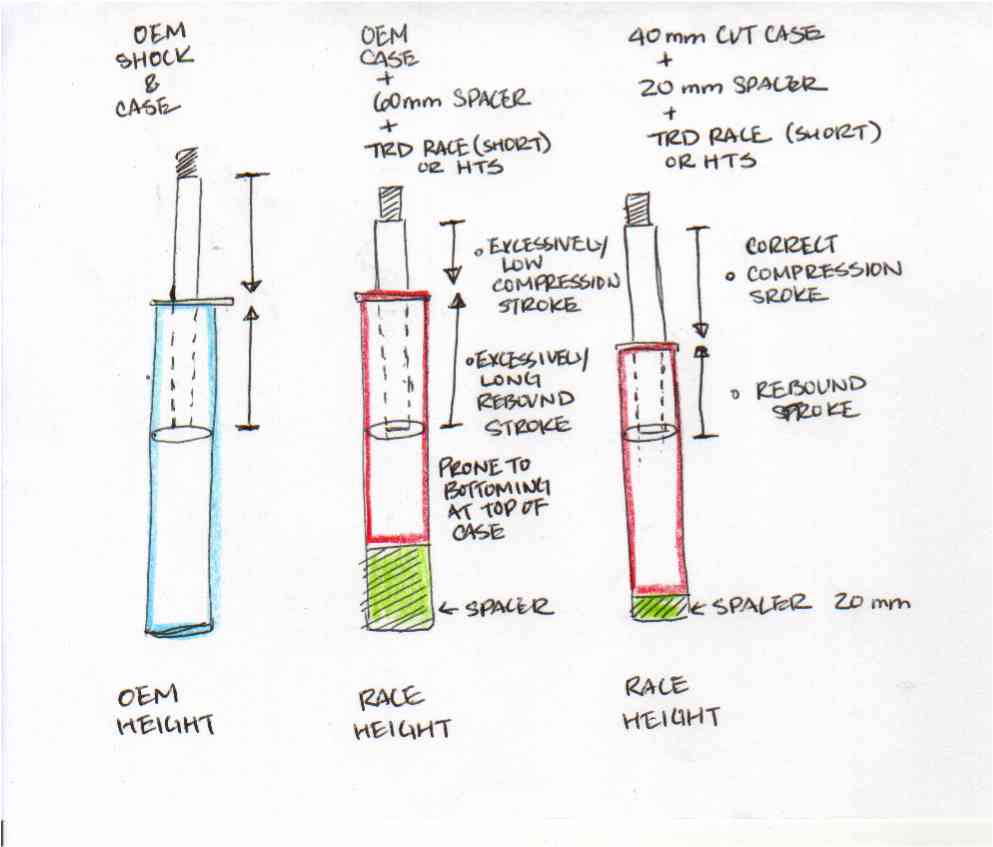
The strut case on a McPherson strut assembly like the system used on the front of the AE86 (and most other Corollas) are designed operate at a certain vehicle suspension height.  Therefore the shock stroke range, compression and rebound, is optimized to the use of standard OEM height strut.  The normal stroke range of the AE86 is 186 mm.  Now, by using the TRD short stroke "race" strut, the overall suspension travel is reduced to 165 mm, a reduction of 21mm.  Add to this the height change by using the short race springs is approximately 30 to 60 mm, depending on your preferred height adjustment of the coil over unit.  By installing this in a standard length case will result in a optimum stoke range be vastly out of position.  Moreover, the strut case will hit the top mount and prevent the full stroke from occurring, and the front suspension will be left with virtually no stroke on the compression side. 
Reason having been explained TRD's decision was to make the strut cartridge 20mm shorter than necessary to provide transferability to other models such as KP61 and AE92.  This design translates to the TRD short stroke unit being 62 mm shorter than comparable OEM strut cartridge. (This may vary by model and other comparable shocks such as the Tokico HTS, which are 60 mm shorter)  In any case, we must do out subtraction here...  So to put a TRD short stroke cartridge into a 40 mm cut strut case, we must also use a spacer at the bottom of the cartridge to place the shock into the optimum stroke location, and in this case the spacer would be 62 mm - 40mm = 22mm, or 22 mm of spacer must be provided to lock the cartridge into correct location.
By careful calculations, you will provide the designed outcome for the TRD short stroke shocks which are in balance with the rear short stroke spring/ shock combination.  The rear system is not a height adjustable design, so front strut assembly must be matched to compensate...and this is where the coil-over conversion becomes handy in taking up slight construction error and to fine tune the fore-aft distribution of weight and overall height.
Finally, I'd like to add that fact that....  the suspension in any automobile is a critical part that supports the car and is holding the tire in place.  As you can imagine, it is VERY dangerous to have these parts fail, even when the car is stationary...  So please use HUGE caution when working with these items and during the design process.  Its not a bad idea to go to a junk yard to buy spare set of parts just to practice on, or even to use as spares if there are any mistakes or faults in the final project.  Its much more comforting and easy to do so, rather than hunting around desperately for parts in a hurry.
OK, and last item here is a few drawing I had done for some BBS questions in the past...please ignore the fact that the drawing is rather crude, it's for guiding you with pictures to get a rough mental picture of purpose and concept of making the conversion...of course the pictures are not to scale so don't be alarmed if your strut case does not look this way...  No, the cartridge is not warped and do not have eyes...(^^)
(Click Photo to enlarge)

Now here's the last advice,
Since you will be taking your suspension apart down to the last nut, I do suggest that you get all your other modifications ready to install at this time.  For example the following things can be added as well to make life easier, so as not to repeat the disassembly...

source: http://www.club4ag.com/faq_and_tech_pages/Short%20Stroke%20Conversion.htm

this conversion is for Toyota ae86 setup front suspension and fits some other vehicle with old model Toyota. 

Tuesday, April 13, 2010

How to Fix Your Car's Air Conditioner

Have you been sweltering in your car because of a broken air conditioner? Here's a short guide to how air conditioning (AC) works, why it might not work, and what you can do about it.

LEGAL WARNING!
- Checking for refrigerant by poking something in the fitting and looking for venting is ILLEGAL as it releases refrigerant into the atmosphere. (Please dont do this with R-12 especially!) Second, it's also ILLEGAL to put more refrigerant into a system known to leak (because, again, youre letting it vent to the atmosphere, albeit more slowly). [Note: The EPA web site disagrees with this statement.]
This is why you may not find a repair facility that will simply top you off, if they suspect that you need to repair a leak first. If you repaired the leaks and failed components yourself, it is legal to recharge the system with 134 without a license, but not R-12. (However, getting a license to handle R-12 is easy online, and runs about $20.)

Steps

   1.
     
      Realize that auto AC is basically a refrigerator in a weird layout. It's designed to move heat from one place (the inside of your car) to some other place (the outdoors). While a complete discussion of every specific model and component is well outside the scope of this article, this should give you a start on figuring out what the problem might be and either fixing it yourself or talking intelligently to someone you can pay to fix it.

    2.
     
      Become familiar with the major components to auto air conditioning:

          * the compressor, which compresses and circulates the refrigerant in the system
          * the refrigerant, (on modern cars, usually a substance called R-134a older cars have r-12 freon which is becoming increasingly more expensive and hard to find, and also requires a license to handle) which carries the heat
          * the condenser, which changes the phase of the refrigerant and expels heat removed from the car
          * the expansion valve (or orifice tube in some vehicles), which is somewhat of a nozzle and functions to simultaneously drop the pressure of the refrigerant liquid, meter its flow, and atomize it
          * the evaporator, which transfers heat to the refrigerant from the air blown across it, cooling your car
          * the receiver/dryer, which functions as a filter for the refrigerant/oil, removing moisture and other contaminants
   3.
     
      Understand the air conditioning process: The compressor puts the refrigerant under pressure and sends it to the condensing coils. In your car, these coils are generally in front of the radiator. Compressing a gas makes it quite hot. In the condenser, this added heat and the heat the refrigerant picked up in the evaporator is expelled to the air flowing across it from outside the car. When the refrigerant is cooled to its saturation temperature, it will change phase from a gas back into a liquid (this gives off a bundle of heat known as the "latent heat of vaporization"). The liquid then passes through the expansion valve to the evaporator, the coils inside of your car, where it loses pressure that was added to it in the compressor. This causes some of the liquid to change to a low-pressure gas as it cools the remaining liquid. This two-phase mixture enters the evaporator, and the liquid portion of the refrigerant absorbs the heat from the air across the coil and evaporates. Your car's blower circulates air across the cold evaporator and into the interior. The refrigerant goes back through the cycle again and again.
   4.
     
      Check to see if all the R-134a leaks out (meaning there's nothing in the loop to carry away heat). Leaks are easy to spot but not easy to fix without pulling things apart. Most auto-supply stores carry a fluorescent dye that can be added to the system to check for leaks, and it will have instructions for use on the can. If there's a bad enough leak, the system will have no pressure in it at all. Find the lowside value and with a gauge check the PSI level. DO NOT use anything else to poke in the value to see if it will come out, THIS IS ILLEGAL (its called venting).
   5.
     
      Make sure the compressor is turning. Start the car, turn on the AC and look under the hood. The AC compressor is generally a pump-like thing off to one side with large rubber and steel hoses going to it. It will not have a filler cap on it, but will often have one or two things that look like the valve stems on a bike tire. The pulley on the front of the compressor exists as an outer pulley and an inner hub which turns when an electric clutch is engaged. If the AC is on and the blower is on, but the center of the pulley is not turning, then the compressor's clutch is not engaging. This could be a bad fuse, a wiring problem, a broken AC switch in your dash, or the system could be low on refrigerant (most systems have a low-pressure safety cutout that will disable the compressor if there isn't enough refrigerant in the system).
   6.
     
      Look for other things that can go wrong: bad switches, bad fuses, broken wires, broken fan belt (preventing the pump from turning), or seal failure inside the compressor.
   7.
     
      Feel for any cooling at all. If the system cools, but not much, it could just be low pressure and you can top up the refrigerant. Most auto-supply stores will have a kit to refill a system, complete with instructions. Do not overfill! Adding more than the recommended amount of refrigerant will NOT improve performance but actually will decrease performance. In fact, the more expensive automated equipment found at nicer shops actually monitors cooling performance in real-time as it adds refrigerant. When the performance begins to decrease it removes refrigerant until the performance peaks again.


------------------
Aircon is very important especially to tropical countries. Always make sure that you check up your car's aircon maybe every 6 months to avoid hassles.

Source

Saturday, April 3, 2010

Auto Windshield Replacement and Repair

It is a fact that auto windshields tend to crack or break and then need replacement and repair. This can happens for various reasons. For instance, a chip of gravel can hit the windshield while the car is in motion. Accidents can obviously cause the windshield to shatter completely. Extreme cold weather conditions are also often the culprit. Many times, car windshields become the victims of vandalism or others’ careless driving. The point is that auto windshields are made of toughened glass, but this glass is still susceptible to damage.

The problem is that car windshield replacement is a costly affair. A viable alternative is windshield repair, which most insurance companies now accept in place of replacement. In fact, they even waive the client’s deductible should he or she choose to repair instead of replace the car windshield. This makes financial sense to insurance companies too, because they save millions each year this way. By repairing instead of replacing an auto windshield, the original windshield retains the integrity of its factory seal. In short, everyone wins. Windshield repair is a high margin specialty service, making it a major industry.

Auto windshields suffer damage in varying degrees. Often, car owners ignore a small crack caused by a flying stone or minor collision. This can be a mistake, since small cracks tend to spread on a car windshield, especially in very cold weather. This is because manufacturers make toughened auto windshield glass under intense pressure. The glass has very high density and this causes cracks to widen progressively. In other words, even small cracks in a car windshield can be a serious matter.

Fortunately, it is now possible to repair cracked and seriously scratched auto windshields. New auto windshield repair solutions include the revolutionary PRISM (pre-resin injection suspension method) technology and various techniques that involve injecting resins into the cracks with or without vacuum. This process can take a few minutes or last as long an hour, depending upon the crack present.

An auto windshield may not always be a good option as repair is not feasible for bigger sized cracks. In such cases, the car owner has no alternative but to replace the windshield. Auto safety norms demand that a motor vehicle has a proper windshield that does not affect the driver’s ability to navigate effectively.

It is possible to undertake car windshield replacement and repair without involving professionals in the process. There are many kinds of car windshield replacement and repair kits available on the market today. Windshield repair kits usually feature the resin compound that acts as filler, injectors that fill this resin into the crack, holding structures to stabilize the affected area and curing lamps to speed up the setting process. Such car windshield replacement and repair do-it-yourself solutions include instructional videos that guide the car owner in the proper use of the kit.


----------------------
You can do replace your windshield. It's easy, just be careful in taking it out.

Source

Friday, March 5, 2010

How to Replace Car Door Locks

The car door lock on the driver side door gets used more than the twin on the passenger side. When the lock quits working, it needs to be replaced. Here are the steps to replace car door locks.

Instructions

      Step 1

      Remove the arm rest and any speaker covers. Next remove the door panel, being careful not to break the plastic clips. Use a screwdriver to remove the screws holding the door handle. Use a pair of pliers to pop out the plastic clip, then twist the clip to allow the interior door handle to swing free.

      Step 2

      Disconnect the rod from the lock core, located inside the door. Remove the two bolts holding the door handle assembly, making sure you mark the position of the rod before you open the clip and remove the door handle assembly.

      Step 3

      Install a new lock. Move the clip from the snap ring to release the lock core. Put in another lock core, then move the clip back to the snap ring to hold the new core in place. Put the door handle assembly back in the door and reconnect the rod. Put both bolts back and reconnect the rod to the lock core. Slide the interior door handle back in place and replace the plastic clip. Use a screwdriver to put the door handle back on, and then replace the door panel, speaker cover and the arm rest.


-------------------
With these instructions you don't need to hire someone to replace your door lock you can now do it on your own.

Source

Monday, March 1, 2010

Troubleshooting Problems With Steering and Suspension

Helping with shimmy, shakes, wheel knocks and bad shocks

Your car's suspension system is an intricate network of cooperating (usually, anyway) components designed to give you a smooth, even, stable ride. Since the suspension is ground zero when it comes to road abuse, the parts wear out, and even break. If your car doesn't seem to ride like it used to, you may have a problem down below.

It may seem daunting to try to diagnose steering or suspension problems, but if you attack it systematically, you have a fighting chance. Just find the symptom that sounds like you and see what the probable causes are.

Money Saver: Before you start replacing parts, it's a good idea to check all of the mounting nuts and bolts to be sure the problem isn't being caused by simple looseness!

Symptom: Pulling to One Side While Driving

    * Low or uneven tire pressure - check tire inflation.
    * Uneven tire wear - check front tires for even wear and replace both front tires.
    * Alignment bad - check and adjust wheel alignment.
    * Steering components bad - inspect tie rods and steering rack.
    * Sticking brake caliper - inspect brakes for uneven wear or excessive heat. Repair as needed.

Symptom: Flip-flop wheel shimmy. Wheels seem to wander and wiggle rapidly back and forth.


    * Low or uneven tire pressure - check tire inflation.
    * One or more wheels out of balance - have wheels balanced.
    * Uneven or excessive tire wear - inspect tires and replace in pairs.
    * Vehicle out of alignment - check and adjust wheel alignment.
    * Worn steering components - inspect tie rods and steering rack for excessive play and repair if needed.

Symptom: Porpoising over bumps or uneven roads. Porpoising, aka bouncing, dipping, diving. Car keeps going up and down after you go over a bump.

    * Worn shocks or struts - replace shocks and/or struts.
    * Broken or slipped leaf spring - inspect leaf springs and repair or replace as needed.

Symptom: Steering seems to be slipping.As you turn the wheel or hold it in a turned position, it feels like its slipping slightly back and forth.


    * Low power steering fluid - add fluid as needed.
    * Loose or worn power steering belt - tighten or replace belt.
    * Bad power steering pump - have checked for pressure and replace if needed.
    * Leaking power steering rack - inspect steering rack for leaks and replace rack if needed.
    * Broken steering rack mounts - inspect mounts for excessive play and repair as needed

Symptom: Hard to steer. Wheel is hard to turn, especially while moving at slow speed.

    * Low power steering fluid - add fluid as needed.
    * Loose or worn power steering belt - tighten or replace belt.
    * Bad power steering pump - have checked for pressure and replace if needed.
    * Leaking power steering rack - inspect steering rack for leaks and replace rack if needed.

Symptom: Steering wheel vibrates at speed. Excessive vibration while traveling a constant speed, especially highway speeds.

    * Wheels out of balance - have wheels re-balanced.
    * Tires worn unevenly or excessively
    * Loose wheel bolts - check wheel lugs for correct tightness.
    * Warped brake rotor - inspect brake discs (rotors) and replace if needed.

Symptom: Loose or sloppy steering. Steering has excessive play and wanders from side to side.

    * Power steering fluid low - check power steering fluid and add if needed.
    * Worn strut bearings - inspect strut bearings for play and replace in pairs.
    * Worn or broken tie rods or steering rack - inspect steering components and replace as necessary.
    * Worn ball joints - inspect ball joints and replace if needed.
    * Broken steering rack mounts - inspect steering rack mounts and repair or replace (some cars can be fixed, others require replacement of the entire steering rack.)

Symptom: Clunking over bumps. Feeling clunks and knocks through the steering wheel when you go over bumps or even cracks in the road.

    * Worn shocks or struts - replace shocks and/or struts as indicated.
    * Worn strut bearings - inspect strut bearings and replace both if needed.
    * Worn ball joints - inspect ball joints for play and replace if needed.

Symptom: Screeching and screaming. Steering emits loud screeching when steering at low speeds, such as parking.

    * Low power steering fluid - add power steering fluid as needed.
    * Loose power steering belt - adjust power steering belt.
    * Worn power steering belt - replace and adjust power steering belt.

Remember, this is a guide to help you diagnose steering or suspension problems. Sometimes more than one issue needs to be addressed to fix the symptoms.


--------------------
Now you can check and fix your suspension and steering by yourself. Just follow the instructions and you'll definitely lessen your car's problem.

Source

Friday, February 5, 2010

Car Care Basics That Anyone Can Do

Contrary to the popular belief, not all car care tasks take a lot of time and require a lot of car skills. As a matter of fact, basic car care can be done by just about anyone, even those with very minimal knowledge of mechanics.

For example, regular washings are a huge part of basic car care. By keeping the outside of your car clean, you are not only keeping your car shiny and looking like new, you are keeping your paint from getting scratched. This is because the debris that can accumulate on the outside of a car over time can act as an abrasive, rubbing off the protective clear coat (if your car has one) and digging into your paint. To be sure, car care does not get much easier than taking your vehicle through a car wash!

One of the other easier components to car care involves regularly checking your oil levels. Believe it or not, you are actually supposed to do this every time you fill up your gas tank. Many people do not do this or fail to do it, and by the time they take their vehicles to a professional to have their oil changed, the engine of the car has been damaged already by the lack of oil that was available. Depending on how frequently you fill up your gas tank, you might not really need to check it each time, but you should definitely do it at least once a month as part of your car care routine.

Speaking of routine car care, when is the last time you changed your windshield washer blades? This should be done at least once a year, and it takes less than five minutes to do. Moreover, changing your windshield wiper blades is one of the most affordable and easiest components to car care. Over time, particularly in the cold winter months, the rubber on the blades can get hard and it will soon crack, scratching the glass of your windshield. Before this happens and you have to get your glass repaired, change them out.

Filling up your reservoir with windshield washer fluid is another easy car care basic. All you have to do is buy the fluid and dump it into the right tank. You do not want to fill it up with water, as when the weather gets cold the water can freeze and expand, bursting the plastic reservoir.


---------------
These are basic things anyone can do for their car. So make sure to check and do it once in a while to maintain and avoid large expenses in your car.

Source

Saturday, January 30, 2010

Do It Yourself Auto Repair Tips: Once-A-Month Maintenance to Keep Your Car

Preventative maintenance isn’t a “cool” topic, but in today’s economic climate it’s more important than ever to keep your car in top running shape so that it will last as long as possible — without costly repairs. By performing a few minutes of maintenance once a month, you can help ensure that your car will be running for a long, long time.

Auto Repair Help for the “Do It Yourselfer”: Learn where things are located under your car’s hood in the video below so you can become a real do-it-yourself auto repair expert in no time.


Auto Repair Tip: Arm yourself with this information so you’ll never get ripped off by auto repairmen again.

With just a little practice, the following tasks can be done in less than 15 minutes. It might take a little longer the first few times you run through the steps, but a few minutes now prevents lengthy waits in repair shops, so it’s worth it. Just follow this list:

    * Check the air filter - If you can’t see any light through the sides, drop it lightly on a hard surface and look again. If you still can’t see light, it’s time for a new filter. Regardless, your air filter should be replaced once a year or each 20,000 miles.
    * Check the belts - If any of the belts has more than 1/2″ of give when you push it, you might be able to adjust it if the belt is in good shape. If any belt is cracked, frayed, or shiny on the inside it should be replaced regardless.
    * Check the battery - If the battery has caps or bars on top, carefully pry them off and check the water level. If low, fill to the top of the metal plates with distilled water. If there are powdery deposits on either of the terminals, they’ll also need cleaning. You can clean the worst of these deposits with a small amount of Coca-cola followed by a small amount of clean water for a rinse. Dry the terminals completely then coat with a small amount of petroleum jelly to keep the corrosion from coming back.
    * Check the radiator - Most modern cars have a coolant overflow tank, so there’s usually no reason to open the radiator. Check to make sure the fluid is at the “full” line. If not, add a 50/50 mixture of coolant and water. Most modern engine blocks are aluminum and require the protection of coolant, so only add straight water in an emergency. Straight coolant is overkill. Never open a pressure cap while the engine is hot!
    * Check the hoses - walk around the front of the engine compartment and feel/look at each hose. Any that are cracked, bulging, or excessively soft should be replaced. It’s cheap and easy to replace a hose before it bursts. If you lose on on the highway the tow charge alone could be 6x the cost or more.
    * Check the oil dipstick - pull out the dipstick and wipe it with a clean lint-free rag (or paper towel). Put the dipstick back in the engine and check it again. The oil level should be between the “add” and “full” lines. If the oil is dirty or smells like gasoline, it’s time to change it.
    * Check the transmission fluid - the transmission dipstick is nearly the same as the oil dipstick, but it’s usually a little harder to spot. It’s checked in the same manner, but if you have to add transmission fluid, it’s added via the dipstick tube. After you check the level, rub a little of the oil between your fingers. It should be pinkish and clean. If not, you’ll need to have your mechanic replace the transmission fluid. This job is far less costly than a new transmission.
    * Check brake fluid - If your car has ABS, refer to the owner’s manual before checking this fluid level. Otherwise, open the top of the brake fluid reservoir and check that the level is between the low and high level marks. Be careful to not get brake fluid on anything painted- it eats paint. Also, brake fluid can be ruined if it’s left exposed to air in as little as 15 minutes, so be sure to keep the bottle closed tightly. If the brake fluid looks dirty, have your mechanic replace it. On average, brake fluid should be replaced every 2 years.
    * Check the power steering fluid - again, make sure the fluid level is up to the fill mark.
    * Check the wiring - if any wires look frayed or if there is lots of corrosion on them, they’ll need to be replaced by your mechanic. Again, this job is far less expensive if you replace them before they fail.
    * Check the washer fluid - while not as critical as the other fluids, it’s worth taking the time to check and fill your washer fluid while under the hood. If you’re in a cold area, it’s important to use a solution that contains antifreeze.
    * Check wiper blades - Obviously you’ll know when your blades are getting old when they start skipping or streaking during a rain storm. Replace them as soon as you notice a problem.
    * Check tires - Check the air pressure in your tires. Properly inflated tires will help improve your gas mileage and will help with even tire wear. If your tires are worn, get them replaced for both safety and to prevent a costly road call.

 Fifteen minutes of effort once per month can prevent hours of towing and repair shop waiting, as well as the costs associated with them. These maintenance items can also help your car last as long as possible.


-----------------
It's better that you check your car especially when you're on a long road trip. Checking it's condition lessens problems and less expensive.

Source

Wednesday, January 6, 2010

6 Brake Problems to Beware Of

No matter how you drive, brake problems can surface and put you and your family at risk. When you develop a brake problem be cautious and call for service. Do not drive the vehicle to another location unless you are stuck in an intersection. The following is a list of the 6 most prominent brake problems:

ABS Brake Warning Light Appears

The ABS warning light means that your car's onboard computer has shut off the ABS braking system. The computer will shut it off when it has picked up on a problem. Your car's brakes will stop you, but you will have no protection against a brake or wheel lock-up. You will be able to get to an auto repair center safely.

Brake Warning Light Appears

This can simply advise you that the car's emergency brake is still engaged. Release it if it is on, and see if the light goes out. More seriously, your brake lubricating and cooling fluid may be low. Take the vehicle and have the fluid checked and filled.

If refilling the brake fluid does not turn the light off, you may have a fluid leak in one part of the braking system. If you are at the auto service center, alert them to check the entire brake system.

Locked Brakes

If your vehicle has ABS, but you still lock up your brakes when applying them, a dangerous problem exists. It could be due to a damaged brake pad, shoe or both, or it could be related to the disc calipers or wheel bearings. Call for roadside assistance and get tow truck right away.

Brake Pedal Won't Go Down at All, "Hard" Brake

This problem has causes ranging from simple: something stuck under the brake pedal; to complex: pinched or failed brake fluid line, or a failure of the power brake boosting mechanism, among others. Check under the brake pedal for a blockage, often just a crumpled floor mat. If this does not solve the problem, contact roadside assistance for a tow to an auto repair center.

Brake Pedal is "Mushy", Goes Down Well Beyond Normal Level

Mushy or spongy brakes can result from air in the brake fluid line. Also, there may be a more serious problem, brake fluid leak or damage to the master brake cylinder. Call for a tow truck and bring in your car to a service center.

Brakes Squeal

The squealing noise made by brakes has many sources. It could be dirt trapped in the wheel. Run the vehicle through the car wash to see if it can be cleaned out. An intermittent brake squeal that sounds only when brakes are on can be from worn brake linings, worn, warped or cracked brake shoes or brake adjusters that need realignment. A continuous brake squeal, even when they are not applied, indicates either wheel bearing damage or that your brake pads have reached the replacement point. Have this repair done soon to prevent brake rotor damage.

Your brakes are your car's key safety system. Have them inspected and maintained regularly.


---------------------
You should always check your car if you notice one of these signs you should check on it to avoid accidents or large expenses in fixing it.
Source

Sunday, January 3, 2010

Dead car battery


A dead car battery is one of the most common problems facing the automotive public. I'm sure at one point you have gone out to your vehicle and found a no start condition due to a dead battery. The question is, what to do next.

The first thing to address is how long will a car battery last. On average, a car battery will last for about three to five years.

In most cases you will find that it will last towards the shorter end of this scale and need to be replaced at the three-year mark.

There are many variables that will determine how long a car battery will last. Some of the things that will send it to an early grave are as follows.

Many short trips on a daily basis can reduce the life of your automotive batteries.

If your vehicle has an average run time of less than 20 minutes, your alternator will not have the opportunity to recharge it fully.

Many starting cycles, coupled with short run time will leave your battery below the ideal charged specification for most of it’s shortened life.

Another reason for a dead car battery would be exposures to extreme temperatures. The cranking power is created by a chemical reaction.

The outside temperature affects this chemical reaction. This is why you will find that most batteries are encased in an insulated jacket.

This insulation allows it to go through its normal temperature changes slowly and can extend overall battery life.

One of the big mistakes that the do-it-yourself and professional mechanics will make is when they replace a car battery they will discard this insulated cover.

This will also shorten the life span. The manufacture put this insulated cover on for a reason so you don’t want to forget to reinstall it.

Dead car battery diagnosis

When your car battery goes completely dead, there are a few factors that will determine your next step. If it is more than three years old, you’re best bet would be to replace the battery.

If you're not sure how old it is your next step should be to charge and test the battery. Note: You should always wear safety glasses and protective clothing. Battery acid is dangerous stuff!

Battery chargers and testers have come down in price in recent years. These are good tools to have around. This way you will have what you need when faced with the dead battery problem.

The testers and chargers are easy to use and have simple indicators of green and red. That will take the guessing out of diagnosing your automotive battery.

Take care of your car battery


If you take care of your battery, it will take care of you. Regular maintenance is a good habit to get into.

If you want your battery to last to the five-year mark, you're going to have to take care of it. This is very easy to do.

The stuff to use is called terminal protector spray. If you apply this product to a new or clean terminals, it will greatly reduce the amount of corrosion that builds up.

Corrosion can prevent the proper automatic charging of the battery from the vehicles alternator.

If you follow this procedure once every six months, it will last much longer. This is one of those situations where an ounce of prevention is worth a pound of cure.

A dead car battery is a fact of life. Being prepared for when this happens is also simpler then you may think.

To avoid being stuck somewhere, you want to make sure that you have a good set of battery cables and safety glasses in your vehicle.

You also want to be familiar with the hook up and operation of these cables.

An even better solution to the dead battery problem is to have your own jump box.

Having your own battery jump box can avoid the problems of hooking up the jumper cables to another vehicle. It is also nice to be able to jump your vehicle without having to ask somebody for help.

These jump boxes have also come down in price over the last few years. My own personal battery jumper is about five years old and has saved my neighbors and me many times.

I own the jump n carry 600 that has been updated to the 660 model. This thing has 1700 peak amps at 12 volts. If this monster does not jump your vehicle then it has another problem. I have jumped dump trucks and buses as well as my wife's Camry with my jump box.

This unit may be overkill for the do it yourself mechanic and it has no reverse polarity protection so you better hook it up right.If your looking for a lighter duty model with built in protection than I would recommend the Duracell jumper below.

All of the tools listed below and talked about above come with easy-to-follow instruction manuals. Learning about how to use these cranking and charging system tools will assure you know what to do the next time you are faced with a dead car battery.


The battery tester below will also diagnose the charging system. And if your vehicle does a lot of sitting take a look at the charge tender. I own most of the tools listed below but for more independent reviews click on the product and view the testimonials.


------------------
Battery tester is also an important tool that you should have. Usually dead battery is a cause when you're car won't start.
Source

Tuesday, December 8, 2009

Make Your Car Look Brand New With An Auto Body Repair


Human beings are born engineers and there is a lot of sundry repair works we usually do on several utilities of day to day life. It includes repairing a bath-tub to mending the fence of our garden. But, when it comes to do some minor repairing works in our vehicles, we often try to escape from the job, and leave everything on the mechanic. However, this escapist attitude exploits us economically and frequent visits of the vehicle to a mechanic surely demean the performance-levels of our favorite car. If, somehow we manage to do some of the auto repairing jobs at our own, then we can save a lot over a few dollars. This isn't as complicated as it often looks and it can be handled manually with some common available tools.

Common Auto Body Repair Tips

Repairing an automobile generally gives us the picture of a person wearing greased clothes, with some complex tools in his hands and he is working with the complicated machineries of your automobile. Undoubtedly there are some issues in the car which needs specialized care, but we can surely settle some of the minor problems ourselves. Minor issues like rust, scratches, marks, etc, if not treated in time can cause potential damages to your vehicle. Some of the most common repair jobs are addressed here:

# Rust Removal - Auto body usually gets rusted due to the combined action of moisture and dust over its surface. Rust is recognized as fading red spots with peeling material from it. This degrades the quality of the metal of automobile and also tarnishes the looks of the vehicle. Rust should be removed from the surface as soon as it is appeared. This can be done by using sandpaper, paint and waxing stuff. First of the surface must be cleared by the sandpaper followed by the application of paint into it. The wax is uniformly coated over the painted surface and the surface is then buffed with the help of a dry piece of cloth.

# Bumper Repair - Bumpers are covered by a plastic shield and when any external damage is done to the bumper body, it is usually affect that outer coating of it. So, first you need to find the type of plastic your bumper is made of. Then according to that material, choose the appropriate paint for it. If any abrasion is done to the bumper, you can try out masking tape for fixing it temporarily. Then, apply the suitable adhesives into it. After this, apply paint and primer over its surface.

# Body Painting - Sometimes our car gets unwanted spots due to collision or other extraneous factors. These marks looks ugly on your favorite car and the proper treatment must be given to these. These marks are repaired by painting the surface. Painting a car is slightly different from painting your house. Painting the former needs more conscientious efforts. Painting should be done after cleaning the surface and uniform coat must be assured.

# Miscellaneous Tips
- Apart from the above measures there are several other steps you can take to jazz up the body of your vehicle. This include, panel beating, under coating, sanding, scratch removal etc.


----------------
For a longer life for your car, maintenance is the key. Always make sure that your car is in good condition.

Source

Tuesday, November 24, 2009

Why Won't My Car Start?

Do I need a jump start? Dead battery? Bad starter? Stuck key?

If you turn your car key and get nothing, or get anything less than an engine roaring to life, you might be in for a bad day. Starting problems can be very frustrating because there are so many things under the hood that can keep a car from starting. Heck, pretty much everything under the hood can keep the car from starting.

In order to troubleshoot a no-start problem, you need to start at the beginning of the line, the battery, and work your way back. Some tests for a no-start problem are simple, others are a pain in the neck and a technical nightmare. Nonetheless, you need to figure out why the car won't start, so we'll try to help. If your key won't turn in the ignition, try this fix.

Electrical No-Start Problems

* Check Your Fuses: Few cars have a fuse associated with the starting system, but before you go monkeying around with everything, check your fuses to be sure it's not that simple.

* Battery Corrosion: Over time your battery connections can become dirty, or corroded. This corrosion breaks the connection your battery has with the rest of the car, and it won't start. Try cleaning your battery posts and try to start the car again.

* Dead Battery: The most common reason your car won't start is a dead battery. If you have a battery tester that can measure cranking amps, test your battery to see if it's weak. If you can't test it yourself, you can test the battery indirectly by jump-starting the car. If it starts right away, your problem is most likely a dead battery. Replace the battery, and clean the battery connections to ensure good contact.

* Bad Igntion Switch: If your battery checks out, but the starter is still silent, it may be a faulty ignition switch. Turn the key to the on position (not all the way to start). If the red warning lights on your dash don't light up (and your battery connections are clean), the ignition switch is bad. If they do light up, turn the key to the start position. The dash warning lights should turn off at this key position (most cars). If you're not sure, turn on the headlights. When you try to start the car, the lights should either dim (a lot) or turn off completely. If they do, your ignition switch should be ok. If not, the switch will need replacement.

* Bad Starter Connection: Corrosion can not only keep your battery from connecting, it can affect any electrical component, especially the ones exposed to the elements like the starter. If you have a helper, you can test the connection by holding a circuit tester lead on the wire that engages the starter. This is the smaller of the two wires connected to the starter. Be sure no part of your body is near the moving parts of the engine - it could still start at any time! Have a friend turn the key and check the current. If you're getting current to the starter but it ain't spinning, it needs replacement.

If your starter spins freely when you turn the key, the problem lies elsewhere. Now you begin to check the other systems that could keep it from firing up.


------------------
Don't panic when this problem happens. Read thoroughly the instrucyions above and then you can identify what's the problem why your car won't start.

Source

Sunday, November 22, 2009

7 Tips on Buying New Car Tires

When the time comes to purchase a set of new car tires, there are several reasons to make sure you make the proper selection for your car. Good tires help maintain safety when driving, they allow your car to handle better and to stop better and they also increase your gas mileage. As you can see, choosing the right tire for your car is very important, it also can be confusing with all the options you have available. Here are a few tips that may make buying new tires a bit easier.

Tip 1: Be Sure You Need Tires

Take a good look at your tires and look for bulges, cracked sidewalls, excessive wear and uneven tread. If you see any of these problems, you need new tires.
Tip 2: Know Your Tire Size

You want to buy the right size and style of tire that's been recommended by the manufacturer of your car. This information is usually in the manual or on the information placard that's attached to your door edge, glove compartment or on the inside of your trunk lid.

Tip 3: Assess Your Car's Condition

Do your tires show signs of uneven wear? If so, your car may be misaligned or you may have a suspension issue. New tires wear quickly on a car that is misaligned or has bad shocks so have a trusted mechanic or the tire center inspect your car before you buy your tires.
Tip 4: Buy a Full Set

It's tempting to replace only the tire or tires that look most worn but it's not practical. Your car is designed to work best with a matching set of tires and replacing all four at one time allows you to maintain your tires better, lets your car to achieve the highest degree of safety, allows for more predictable handling and can help with issues that may appear later such as suspension problems before they become major complications.

Tip 5: Check Your Spare

Now is a good time to make sure your spare tire is in good shape. If it needs to be replaced and is a full sized spare, you might be able to save one of the better tires you are replacing for your spare.

Tip 6: Break In Your Tires

There is a release agent that is used during the tire manufacturing process that leaves a residue on the tread of the tire. This means there's a chance your tire may not grip as well as it should until the residue is gone. Allow about 500 miles of break in time before you start to push your tires on cornering. You can also anticipate longer breaking distances than usual until the residue has completely worn off.

Tip 7: Maintain Your Tires

It is very important that you keep tires properly inflated as this helps tires last longer and you will see better gas mileage so check tire inflation regularly.


--------------
If you're going to buy a new tire keep your old ones that are still ok to use you may use it in the future as reserve or spare tires.

Source

Thursday, November 12, 2009

How a Car Muffler Works

Though your probably put almost no thought into your car muffler, you have probably heard—and even complained—about a noisy car without a muffler. Obviously, a muffler makes a big difference in the amount of noise pollution a car creates. But how exactly does it work? What follows should help you gain a basic understanding of your muffler's job and how it operates.

Sound Waves

Car mufflers work using a simple principle that works on any kind of wave, including sound waves. This principle is called destructive interference.

Any wave of any kind, including a sound wave, has a high point, or crest, and a low point, or trough. The difference between the crest and the trough controls how powerful the wave is—a wave with a large difference will be very powerful, while a wave with a small difference will be very weak. A wave with no difference isn't a wave at all.

When two waves are combined, they will either interfere constructively or destructively depending on their position. If the wave crests and troughs occur at the same point, they will combine, resulting in higher crests and lower troughs, and an overall more powerful wave. If the crests of one wave occur at the same time as the troughs of the other, the waves will still combine—but in this case, the resulting wave will be weaker than the 2 original waves, even if they were both quite strong to begin with. Destructive interference is this second kind of interaction, where two strong waves become one weak wave. By using this technique, your muffler can reduce the amount of sound coming from your engine.

Putting It into Practice

Your car's muffler is connected to its exhaust system. As exhaust gases travel towards the exit, they are sent through a set of tubes in your muffler leading to a chamber called the resonator. The resonator is intentionally designed to amplify and redirect the sound waves caused by your engine. However, the way the resonator directs those sound waves reflects them back to the source in such a way that causes the waves to destructively influence themselves.

While a resonator chamber cannot eliminate all sound, it is designed to target particular frequencies at the expense of others. By targeting the loudest frequencies produced by your engine, and the most offensive ones to human ears, the resonator chamber maximizes its efficiency at its intended task, even if it isn't perfect.
Other Methods

While destructive interference is the most common technique car mufflers use to cancel out unwanted sounds, there are other kinds of mufflers that are commonly used. Many mufflers use more than one technique to maximize their efficiency.

For example, another kind of muffler, called a cherry bomb muffler or a glass pack muffler, does not use destructive interference to cancel out sound. Instead, it sends exhaust and sound waves through a tube with holes in it that lead out into sound absorbing material. Cherry bomb mufflers have the advantage of reducing back pressure and increasing efficiency.


----------------
Muffler adds a strong personality to your car because of it's loud sound and feels like your ready to race anyone on the road.

Source

Tuesday, November 10, 2009

Do-It-Yourself Automotive Axle Assembly Repair Tips and Tricks

Replacing an axle assembly is not as difficult as you may think. For front-wheel drive cars , and for some rear-wheel drive cars, this can be a do-it-yourself job. You will want to review the repair manual of your vehicle to decide, based on your own mechanical skill, whether you feel comfortable tackling this project yourself.

A common repair that often must be done after general wear on a vehicle is the replacement of a CV joint. In many cases, it makes good financial sense to replace the entire axle assembly instead of repairing the joint alone. Since replacing a CV joint can be a labor-intensive job, it may also be easier to replace the entire axle assembly. Doing so will save time and thus cut labor costs-you can often replace the entire assembly for the same cost as replacing only the joints. This will, however, depend on how much your mechanic charges you-unless you decide to attempt the installation on your own.

New axle assemblies generally come with fresh CV joints and boots already installed, so you do not have to buy both the assembly and the joints. Since the entire assembly works through the boots, it is important that all parts are well-maintained and work in harmony with one another.

Again, read the installation instructions for your vehicle's make and model. If you are fairly comfortable working on your own car , then this may be a project that you want to tackle yourself. Doing so would save you the money you would otherwise pay a mechanic.

An axle assembly is used mainly in front-wheel and four-wheel drive cars to transfer power from the transmission to the wheels. Most rear-wheel drive cars do not use an axle assembly, though there are a few exceptions, primarily high-end German sports cars. One reason that CV boots and axle assemblies fail, is due to the access of debris and contaminants. Debris can get inside of the boot if the boot comes loose or becomes cracked. When this happens, CV joints will quickly degenerate and fail.

If you own a four-wheel drive vehicle and take it off-road on a regular basis, you are more likely to experience problems with debris getting inside of the seals. This is even more common if you like to go 'mudding' and do not wash all of the mud out from the undercarriage of your vehicle.

Choosing a manufacturer for your new axle assembly is important. For many vehicles, you can go with OEM or aftermarket parts. If you own a specialized vehicle like a Bertone, you will want to go with Bertone parts, because keeping original Bertone parts would help to maintain such a vehicle's value.

If maintaining all original-brand parts is not important to you, then you have many choices when it comes to replacement manufacturers. Many of these aftermarket replacement parts can be found at a lower price-sometimes of a higher quality, as well. When buying auto parts, it pays to shop around and find the best quality and price.

Most of the time, a new axle assembly will come with a solid warranty, so that you do not have to be concerned about part failure in the immediate future. It is important as both a buyer and a mechanic to be selective and to get the right part the first time. Doing so will prevent having to remove newly-installed equipment, because it is not the right one for your vehicle.

Research and investigation can help you determine the best replacement parts for your vehicles. And using the internet to make your purchases will allow you to save a lot of money, while improving the quality of products you are able to buy within your budget.


---------------
DIY repairing in your car save lots of your money. Make yourself familiarize with your car parts or if you bring it to shop make sure that you study and witness what the mechanic is doing so next time id the trouble happened again you can do it all by yourself.

Source

Sunday, November 8, 2009

How to Fix a Leaky Car Window

If you have discovered that your floorboards, seats or car dash are wet following rain or morning dew, it is likely that you have a leaky window, even if you haven't actually seen rain coming in. You may also detect a musty or mildew-like odor in your car that comes from the car's interior regularly getting wet. As long as the cause of the leak is minor, finding and repairing a car window that is leaking is a task that many people can handle on their own.

Difficulty:
Moderate

Instructions


Things You'll Need:


    * Garden hose
    * Utility knife or razor blade
    * Rubbing alcohol
    * Polyurethane sealant or silicone caulk
    * Caulking gun
    * Rag
    * Silicone rubber


      Step 1


      Sit in the rear seat of the car and have someone else spray water on the vehicle with a garden hose to locate the window that is leaking. Watch all of the side windows and the windshield to find out where the water is coming in.

      Step 2


      Remove the trim from around the edge of the window that has the leak. Find the seam of the trim, which is generally at the bottom on side windows and at the top corners on the windshield. Pull the trim out from the window slowly and it will pop free of the window edge.

      Step 3

      Inspect the edge of the window for missing caulking or black, mildewed spots in the caulking. Also, look at the edges of the window for cracks or chips in the glass.

      Step 4

      Add new caulking if there is missing or damaged window caulk. Remove the old caulking by carefully trimming it away with a utility knife or razor blade and clean the area thoroughly with rubbing alcohol to remove leftover debris. Don't let the alcohol drip onto the good caulking.

      Step 5

      Replace the caulk with polyurethane sealant or silicone caulk using a caulking gun. Polyurethane sealant and silicone caulk are available in home improvement and hardware stores.

      Step 6

      Use silicone rubber on cracks at the edges of the window. Silicone rubber will stop leaks from small flaws and will be covered up once the trim is put back into place.

      Step 7

      Press the trim back into place all around the edge of the window. As long as the trim was not bent during removal, it should be easy to push back into the ridge.


---------------
This is a major problem especially to those car windows without a frame. Due to heat the rubber becomes brittle and it cause leakage in windows.

Source

Friday, November 6, 2009

How to Clean Rust From Steel

Rust is like cancer for automobiles. If you don't catch it immediately when it starts, it will spread

across the entire body of the vehicle. Removing rust from steel components is a challenge. You will need to de-oxidize the rusting area with a special agent made for this purpose.
Difficulty: Challenging

Instructions

Things You'll Need:

    * 1200 grit sandpaper
    * Rust converter
    * Application brush
    * Clean rag


      Step 1

      Sand the rusted area with 1200 grit sandpaper to remove any loose rust.

      Step 2


      Apply the rust converter to the rusted steel with an applicator brush. Make sure you get good coverage over the rusted area. Don't worry about using "too much." If you use too little, you will not convert the rust.

      Step 3

      Wipe up any areas that you applied the rust converter to that don't need it with a clean rag.

      Step 4

      Wait 30 minutes to an hour. The rust will turn black. This is normal. The rust is now converted to a primer that can be sanded and painted like regular steel.


--------------
I already tried this one and it really pains my arm because you have to sand the rusty part and make sure that it is properly sanded before you apply rust proof in it.
Source

Wednesday, November 4, 2009

Auto Repair... made easy...Get the help you need to do your own car repairs.

Auto Repair... made easy...Get the help you need to do your own car repairs.
Auto repair doesn't have to cost a lot... when you do it yourself, there are no $100 and hour labor rates or huge parts mark-ups... only the satisfaction of knowing you did it yourself. I've spent more then half my life watching the largest auto repair chains get richer, while good people get poorer. Now I want to pass on to you, the knowledge you need to do it yourself and not pay those high costs.
And yes...you can do it yourself.

tune-upIt seems the auto manufacturers and repair shops want everyone to believe that todays vehicles are "TOO COMPLICATED" for the average do-it-yourselfer to do even a minor auto repair...that's just not true. The right tools, the right information, and the right attitude are all you need to get the job done, and done right.

Here's how I can help...

With over 20 years of experience as a mechanic, and technical instructor, I'll show you how easy car repair can be. I'll give you access to the information the big companies don't want you to have.

The right tools, the right information, and the right attitude are all you need to get the job done, and done right.

With my free online tutorials you can do it just as successfully as any big name shop.

I'll show you why brakes squeal and techniques to prevent brake squeal and noise from happening in the first place. Today's brake systems are not the same as they were 20 years ago... a lot has changed. Smaller brake systems... heavier vehicles...and electronics like A.B.S. and Traction Control have changed the way a brake job is done. I want to show you how to do a 21st century brake service...the way the pros do it. You can do it just as well, and save hundreds of dollars.

How about the 100k mile tune-up myth? Yes, today's modern cars and trucks need tune-ups just like older cars...the difference is the definition of a tune-up, how often it should be done, and the damage that can be caused by not doing it. They don't want you to know that by doing a regular tune-up, you can prevent hundreds of dollars in repairs from happening.

Perhaps there is a pesky check engine light on... or maybe a misfire...check out the diagnostics section. Auto repair doesn't have to be complicated... It's easy when you know how...

You'll also find sections on Auto Detailing and Auto Performance...something for everyone...all with easy to follow tutorials, and step-by-step instructions.

So look around and see what we have...if you don't find what you need, contact me, and I'll do my best to walk you through it. But you can be sure that subject is coming soon.

Remember the right tools, the right information, and the right attitude are all you need to get the job done, and done right.


-------------
As long as you love what you are doing you can do it on your own especially in fixing your car. It saves a lot of your money if you do it by yourself. Kust make sure that you know what you are doing, you can ask some of your friends what to do.

Source

Sunday, November 1, 2009

Suspension

Before you start working on your vehicle, make sure you have a good repair manual. We recommend an online manual from ALLDATA You can even find out things only the dealer knows about your vehicle with TSBs, which are included with your ALLDATA manual.

Common Problems:

* Shocks and struts can wear out and affect handling. If you car bounces excessively over bumps and leans hard in corners, your shocks could be warn. Look behind the wheel for the shock or strut and look for leaking oil. This is a sure sign of a worn shock or strut.
* Ball joints. Ball joints wear and can cause your car to wander while driving down the road. This is dangerous as they can separate and cause you to lose control.

Preventive maintenance:

* Check your shocks or struts for leakage frequently. Also pay attention to how your car handles. If you notice the ride deteriorating take your car in to have the struts checked.
* Ball joints should be checked when your car is inspected, if not, have your mechanic check them at least twice a year.
* At each oil change make sure you or your mechanic lubricates the ball joints and any other suspension components. Some components can not be lubricated as they are sealed from the factory.

and make sure you choose the right suspension for you for more handling performance


--------------
It right to have a preventive maintenance to avoid large expenses in fixing your car. It's easy to replace suspension and you can do it on your own.

Source

Friday, October 30, 2009

How to Remove a Power Steering Pump Belt

A power steering pump belt is used to transfer the rotating energy produced by the engine to the pump, where the fluid within the pump is then directed to the rack and pinion unit. Over time, the rubber belt stretches, producing a squeaking sound when the steering wheel is turned, particularly at slow speeds. The belt can also develop cracks over time, which can cause the belt to break unexpectedly.

Difficulty: Moderately Easy


Instructions Things You'll Need:

* Wrench


Step 1

Locate the power steering pump bracket bolts. Power steering pumps are secured to the side of the engine with two metal brackets. One side of each bracket bolts to the engine, while the opposite side of each bracket attaches to the power steering pump. A single retaining bolt is located at the top of the pump, and another bolt is located at the bottom of the pump. These two bolts secure the pump to the brackets.

Step 2

Loosen the two bracket bolts that hold the power steering pump in place with a wrench. It is not necessary to remove these bolts. Note that the bolt that secures the lower bracket to the bottom of the power steering pump is inserted through a slot. This slot allows the tension on the pump's belt to be adjusted by moving the pump either toward or away from the engine.

Step 3
Push the power steering pump toward the engine to eliminate the tension on the pump's belt, then pull the belt away from the pump's pulley.

Step 4

Pull the opposite end of the power steering pump belt away from the engine's bottom pulley, then up and over the fan blades to complete the removal process.


----------------
It's easy to remove a power steering pump belt and you can do it on your own. It doesnt need an expertise in removing it.

Source

Thursday, October 29, 2009

How to Install an Engine Thermostat

An engine thermostat is an essential component of the engine cooling system. It regulates the temperature of the coolant and ensures that your engine remains cool. Thermostats work because of a wax pellet embedded in the thermostat. When the wax pellet heats up to a certain temperature (typically 195 degrees), it expands and pushes on the thermostat plunger, thereby allowing coolant to flow through the radiator. From time to time, these thermostats fail and remain open or closed, causing the engine to run too cool or too hot, respectively. The more dangerous situation is the latter because an overheated engine can cause serious engine damage.

Difficulty: Moderate
Instructions
Things You'll Need:

* Thermostat
* Ratchet
* Sockets
* Flathead screwdriver
* Sandpaper
* Drain bucket


Step 1

Allow the vehicle to cool down.

Step 2

Drain the coolant from the radiator by unscrewing the drain bolt at the bottom of the radiator located at either the right or left corner.

Step 3

Follow the upper radiator hose leading to the engine, and where the hose is attached is the thermostat cover.

Step 4

Unscrew the hose at the thermostat cover, and remove by twisting and pulling.

Step 5

Loosen the thermostat cover, and remove it.

Step 6

Remove the old thermostat, and replace the new one.

Step 7

Reinstall thermostat cover with the new gasket. Scrape off the old gasket material completely or coolant could leak at the joint.

Step 8

Reattach the upper coolant hose to the thermostat cover and tighten.

Step 9

Screw the drain bolt back into the radiator, and re-fill the radiator with a 50/50 mix of anti-freeze and water.

Step 10

With the radiator cap off, start the vehicle and rev the motor up to 2,000 RPMs for a minute with the heat on max. You are allowing the coolant to circulate through the system and are eliminating all air pockets from the coolant. This is called "bleeding" the cooling system and ensures that it runs at the proper temperature without worry that any overheating will occur.

Step 11

Reinstall the radiator cap.


-----------
Engine thermostat is important in regulating temperature in your engine. Now, you can install engine thermostat in your car without spending too much money.

Source

LinkWithin

Related Posts with Thumbnails

Followers